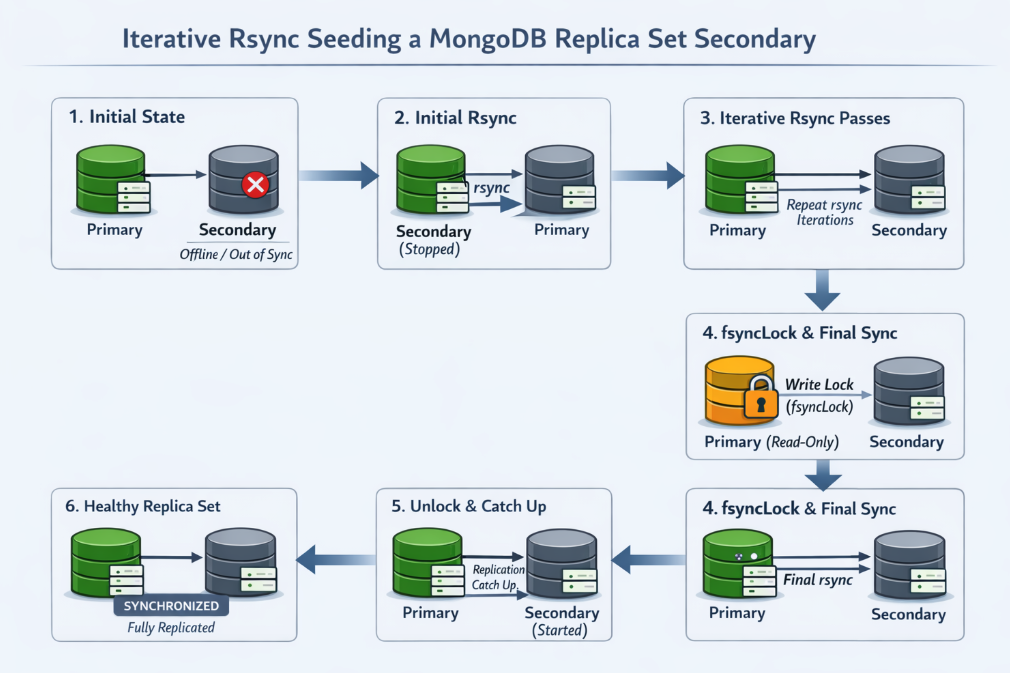
When the standard MongoDB procedures for resyncing a replica set member fail, iterative rsync seeding can be an effective fallback. This approach allows you to recover a secondary node with minimal write unavailability and no full downtime, making it especially useful for large datasets or slow networks.
⚠️ Important: Always test this procedure in a development or staging environment first, and make sure you have a current, verified backup before attempting this in production.
When Iterative Rsync Works Best
This method is most effective under the following conditions:
-
Network bandwidth is slower than disk I/O
-
Only a small number of files change between rsync runs
-
Modified files are relatively small
-
(Optional) Data files fit into the filesystem cache
If your network speed is comparable to disk speed—or if many collections and indexes are actively changing—subsequent rsync passes may take nearly as long as the initial copy.
For best results, perform this during low-traffic periods or a maintenance window. Heavy write activity can prevent rsync iterations from becoming progressively faster.
Scope and Limitations
-
Works for automated and non-automated replica sets
-
Supported across all MongoDB versions
-
❌ Not supported for MongoDB Atlas deployments
Step-by-Step Procedure
1. Prepare the Target Secondary
Stop the mongod process on the secondary you want to recover, then remove all files in its dbpath.
2. Perform the Initial rsync
From the target secondary, copy data from the current primary using rsync.
Example:
rsync -av root@mongo-source:/mongodata/ /mongodata/
Notes:
-
Replace
mongo-sourceand/mongodata/with your actual host and data path. -
Do not use the
-z(compression) flag. Compression can significantly increase transfer time for WiredTiger datasets.
3. Repeat rsync Until Runtime Stabilizes
Run the same rsync command multiple times. Each iteration should complete faster as fewer files change.
Continue until:
-
The runtime falls below the amount of read-only time you can tolerate on the primary, or
-
The runtime stabilizes and no longer improves
4. Lock Writes on the Primary
Connect to the primary using the MongoDB shell and run:
db.fsyncLock()
This pauses writes and replication.
Best practice:
-
Keep this shell session open
-
Maintain a second shell connection to the primary in case the first one disconnects before unlocking
5. Run the Final rsync
With the primary locked, run the rsync command one last time and wait for it to complete.
6. Unlock the Primary
Resume normal operations by running:
db.fsyncUnlock()
Alternatively, you can restart the primary’s mongod process.
7. Remove the Lock File on the Secondary
On the target secondary, delete the mongod.lock file from the dbpath.
This file was copied from a running instance and falsely indicates that the data directory is in use. Removing it allows the secondary to start cleanly.
8. Start the Secondary
Start mongod on the target node as usual.
The node will:
-
Catch up via replication
-
Transition into
SECONDARYstate -
Rejoin the replica set normally
Final Thoughts
Iterative rsync seeding is not the first tool you should reach for—but when conventional resync methods fail, it can save hours (or days) of downtime. Used carefully and tested properly, it’s a powerful technique for large or bandwidth-constrained MongoDB deployments.