
Part 1 covered the core CDC pipeline — Debezium, Kafka, ClickHouse, and getting your first pipeline running. This post covers everything we shipped in v1.1.
When we published Part 1, the connector supported four source databases and a five-step wizard. The feedback pointed in a clear direction: teams wanted more control over what gets replicated, better pipeline management, and the ability to connect their own infrastructure. v1.1 delivers all of that.
Column Filtering
The most requested feature since launch. Before v1.1, when you selected a table to replicate, every column came along — including columns you don’t care about, columns that contain sensitive data you’d rather not copy, or large text fields that inflate your ClickHouse storage unnecessarily.
Now, in step two of the pipeline wizard, you can expand any selected table and see all its columns. Click a column to exclude it from replication. It turns red with a strikethrough. That column will not appear in the ClickHouse schema and will be dropped from every event before it’s written.
A few things worth knowing about how this works under the hood:
Primary key columns can never be excluded. ClickHouse’s ReplacingMergeTree engine requires an ORDER BY key. If you could exclude your primary key, the table couldn’t be created. The UI enforces this — PK columns are shown with a green badge and clicking them does nothing.
Exclusion happens at write time, not at the connector level. Debezium still captures all columns from the source. The filtering happens in the BlancoByte Sink before the row is written to ClickHouse. This means you can change which columns you replicate by recreating the pipeline without touching any Debezium configuration.
The ClickHouse table is dropped and recreated when you change column selection. If you initially replicated all columns and then want to remove one, start a new pipeline — the old table will be replaced with the correct schema automatically.

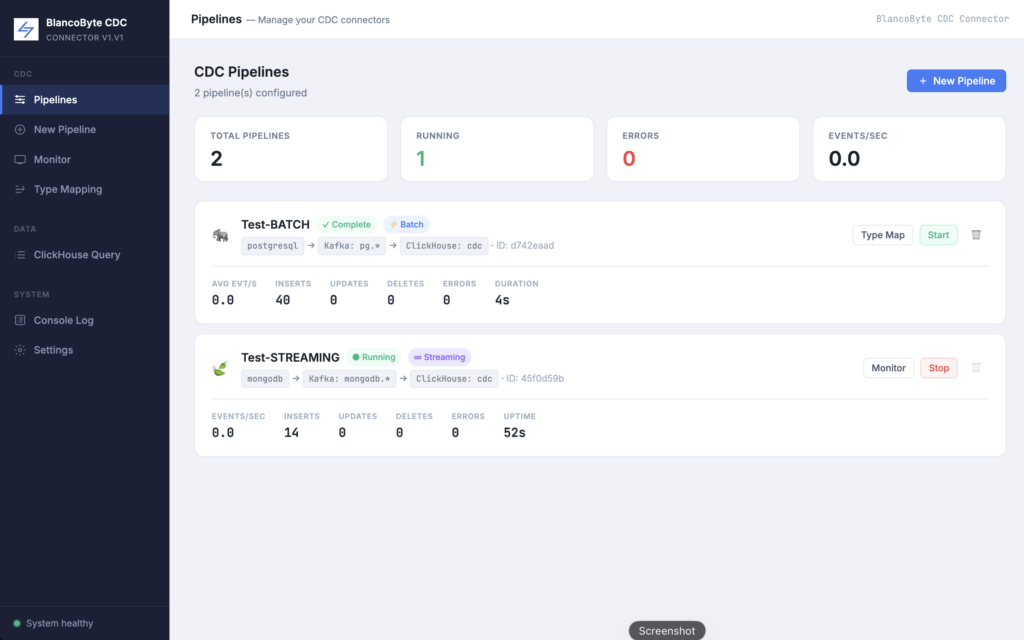
Streaming vs Batch — and Auto-Stop
The connector has always supported two pipeline modes. Streaming runs continuously, picking up every change in real time. Batch takes a full snapshot of the selected tables and then stops.
In v1.0, batch pipelines required a manual stop. That’s fixed. v1.1 batch pipelines detect when all Kafka partitions have reached end-of-partition — meaning the snapshot is fully consumed — and stop themselves automatically. The pipeline status changes to ✓ Batch Complete in the UI. If the pipeline encountered errors, it shows ✗ Failed instead.
The stop button also disappears once a pipeline is complete or failed, which makes the pipelines list significantly less cluttered.
Alerting
Long-running streaming pipelines need monitoring. A pipeline can appear healthy in the UI while silently falling behind — the source is producing changes faster than the sink can write them, or errors are piling up in the dead letter queue.
In v1.1 you can configure alerting directly in the pipeline creation wizard, in the Type Mapping step. Enable alerting, set a lag threshold in seconds, and provide a webhook URL. When the pipeline’s event lag exceeds the threshold, a POST request fires to your webhook with the pipeline name, current lag, and error count.
The webhook payload is compatible with Slack, Microsoft Teams, and any service that accepts an HTTP POST with a JSON body. For Slack, you create an incoming webhook in your workspace settings and paste the URL directly into the field.
Pipeline Scheduling
For batch pipelines, v1.1 adds cron-based scheduling. Enable scheduling in the Type Mapping step and enter a cron expression. The pipeline will run automatically on that schedule — taking a fresh snapshot of the selected tables and stopping when complete.
0 2 * * *       every day at 2am
0 * * * *       every hour
*/15 * * * *    every 15 minutes
0 0 * * 1       every Monday at midnight
Scheduling is only available for batch pipelines. Streaming pipelines run continuously by definition and don’t need a schedule
S3 / Object Storage Sink
ClickHouse is the primary destination for all CDC events — that hasn’t changed. But some teams also want a durable copy of their raw change events in object storage for archiving, compliance, or feeding other pipelines.
In v1.1 you can enable an S3 sink alongside ClickHouse in the pipeline creation wizard. Every CDC batch is also written to your S3 bucket as Parquet files, partitioned by pipeline and date. Configure your bucket, region, prefix, and AWS credentials in the ClickHouse step of the wizard.
The S3 sink is optional and additive — disabling it has no effect on the ClickHouse pipeline.
External Kafka Support
Until now, the connector shipped with a bundled Kafka instance that worked out of the box. That’s still the default — kafka:9092 is pre-filled in the wizard and requires no configuration.
But if you already run Kafka in your infrastructure, or if you use a managed service like Amazon MSK or Confluent Cloud, you can now point the connector at your own cluster. In step three of the wizard, replace the broker address with your own. Multiple brokers are supported as a comma-separated list.
SASL/SSL authentication for MSK and Confluent Cloud is supported — reach out if you need help with the configuration, as the exact parameters depend on your cluster setup.
BlancoByte CDC Connector v1.1 is available now. If you’re already running v1.0, pull the latest ZIP, run a clean rebuild, and your existing pipelines will keep working. New features like column filtering and alerting are available when you create new pipelines.
As always — if you hit something broken, something confusing, or something you wish worked differently, reach out. The connector gets better because of that feedback.